DEV 3D
A Historic Project Toolkit
TUTORIAL 2: Virtual Reality
Create stunning Virtual Reality tools quickly and effectively.
TUTORIAL 2: Virtual Reality
So you've created your 3D model, and it's the most stunning 3D model ever created, but now you have to figure out what to do with it.
As historic sites, like yours, continue to embrace new technologies, many are taking the step beyond a virtual website, and into the realm of Virtual Reality. Don't panic. This tutorial will show you how easy, quickly, and free it is to create Virtual Reality (VR) experiences for your historic site.
If you've created a 3D model of an artifact, such as a plate or bell, VR may not be the appropriate space to showcase your artifact. Instead, look to Tutorial 3: 3D Printing for instructions on how to have your model printed out for use at your historic site.
Required Materials
Before getting started, there are materials and website you should familiarize yourself with.
While this tutorial does not use expensive VR headsets or glasses, you will need to find some cheap or free VR headsets. Google Cardboard is an excellent option, as they are accessible and cheap, as well as light weight and useable with contact lenses and glasses.
Most Google Cardboard headsets cost less than $5, and even less if you purchase them in bulk. This makes them excellent investments for specialty tours, hands-on exhibits, or personal exploration. Google has a variety of lenses to choose from, but the standard Cardboard will do the job just fine. On the Google website, prices start at $15, but can be found cheaper through 3rd party vendors. You can even design them with your own logo or color palette.

Time to Get Started: Sketchfab
Sketchfab is a 3D modeling tool that seems too good to be true, yet here it is. So let's take advantage.
For the remainder of this tutorial, we will be utilizing Sketchfab's free software and toolkit in order to give our 3D models a purpose. Below you will find screenshots and videos detailing the steps needed to produce a usable 3D model for a VR experience or website component.
Begin by heading to Sketchfab's website and registering for an account.
Once on the homepage, look for the blue "Join for Free" button on the left hand side, and go ahead and register. All we need for this tutorial is the free version, so skill the payment and subscription page when you get to it.

Once you've created an account, head towards the yellowfins UPLOAD button on the top right of the screen and click it.

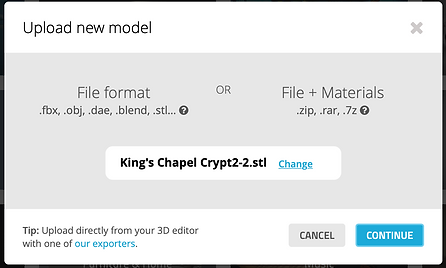
A window will pop-up, indicating which file types are accepted by Sketchfab. Fortunately for us, Sketchup's Free software only exported in .stl files, which Sketchfab can ingest.
Click CHOOSE FILE and upload your saved .stl file. The window will then reflect that the upload was successful.

Object Identity and Description

Time to enter some information
This window allows you to populate your model with some meta-data, or back end data, such as descriptions and key words. Here's your opportunity to tell the community a little about your project and your 3D model, as well as give it some key words that make it searchable.
Clarity is key here, so be concise.You can always go back and change the information if you feel inclined or your language requires an update.

King's Chapel Tomb Example
Here you can see how information was willed out for the King's Chapel Tomb case study. There is a model name, which is searchable through Sketchfab, a brief description, categories, and tags that will aid in sorting our model into categories.
The more information filled, as indicated by the meeter in the bottom right corner, the easier it will be for Sketchfab community members to find your work.
The tomb model has now been given an identity, and populated with metadata. Once you've completed filling out the window, it's time to move onto editing the model and preparing it for production as a Virtual Reality application and experience.
You should see a page like this after completing the above steps, with your model in the center as opposed to the tomb model. For the next steps, follow the video below to complete Tutorial 2.

This video introduces users to the various tools provided by Sketchfab. Some of these include lighting, texture, and background rendering.
Once you've completed editing your model for VR viewing, it's time to share it on your website or export it as an app on your phone.
To do this, click on the SHARE button above your project description. This will give you a link that you can share via several methods: email, twitter, facebook, etc.
Open the link on your phone, and click the VR Headset icon to open up the VR experience.
Now that you've shared your model and opened it up in the VR environment, it's time to explore and navigate the final product. To navigate around the object, look towards the desired direction and notice the yellow circle that appears.
Click on the mesh "button" on the top of your Google Cardboard headset, and spin to face the object once again. Continue to move around the space and explore your creation.
If any issues occur, simply close out the app on your device, and reopen it to reset the view.
